|
Service |
|
|
|
The valve must be placed vertically and can be fitted on both high and low level lines and on appliances which need to be vented.
The accompanying shut-off valve is screwed on the pipe connection. The air escape valve is then screwed on (note the fibre washer — no hemp and linseed oil to be used). Open the shut-off valve and the automatic venting comes into operation.Do not place the valve where a risk of freezing could occur.
AIREX and AIREX MINOR can also be used for venting lines and appliances for other liquids than water providing that they do not attack rubber and/or fibre parts.
When fitting out of doors or where the valve could be subjected to water spray, the overflow protection system should be placed out of function by removing the fibre washers under the cap (6).
 |
AIREX
Here you can download:
Airex - Service.pdf (0,2Mb)
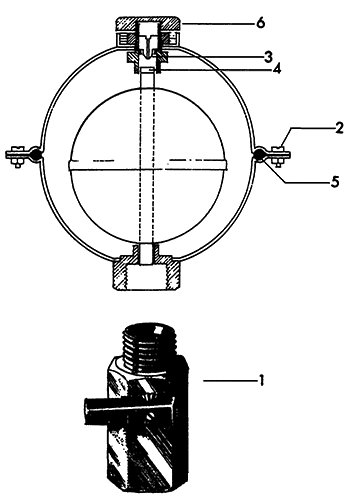
Close the shut-off valve (1) and unscrew the air escape valve.
Take apart the valve by removing the 11 screws (2) which hold the valve body halves together.
Clean all parts and check the nozzle (3) and rubber plug (4) on the float. Replace any damaged parts with new ones.
Check that the float seals properly by shaking it and listening for any water splash in it.
Check the 0-ring (5) between the valve body halves - replace with a new one if damaged - and assemble the valve body. Make sure that all the 11 screws (2) are tightened evenly.
If water has leaked out from the valve the overflow protection function must be reset. Screw off the cap (6) and replace all the fibre washers under it with new ones. Note that only genuine washers should be used, otherwise the function cannot be guaranteed.
Screw the air escape valve on the shut-off valve — do not forget the fibre washer — open the shut-off valve and check the function.
|
|
AIREX MINOR
Here you can download:
Airex Minor - Service.pdf (0,22Mb)
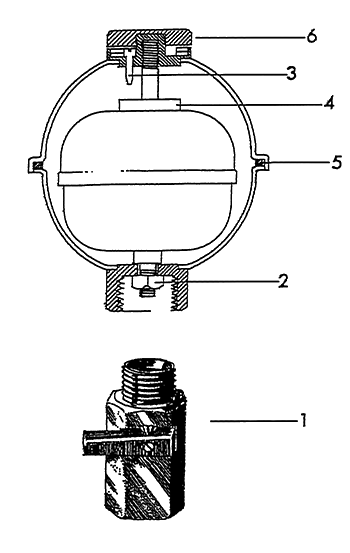
Close the shut-off valve (1) and unscrew the air escape valve.
Take apart the valve by unscrewing the nut (2) with an 8 mm socket spanner.
Clean all parts and check the nozzle (3) and rubber washer (4) on the float. Replace any damaged parts with new ones.
Check that the float seals properly by shaking it and listening for any water splash in it.
Check the rubber gasket (5) between the valve body halves — replace with a new one if damaged — and assemble the valve.
If water has leaked out from the valve the overflow protection function must be reset. Screw off the cap (6) and replace the fibre washers under it with new ones. Note that only genuine washers should be used, otherwise the function cannot be guaranteed.
Screw the air escape valve on the shut-off valve — do not forget the fibre washer — open the shut-off valve and check
the function. |
|
|